FlowBatch user guide
Everything the panel does, in the order you will meet it. Twenty-two short chapters, each with pictures. Nothing here assumes you have used an extension before.
Written for version 1.2.1 · Updated 17 September 2026
New here? Chapters 1 to 5 take you from an empty browser to a folder of finished images. Read the rest when you need them.
01 Install FlowBatch
Get the extension into Chrome and open the panel for the first time.
Open FlowBatch on the Chrome Web Store.
FlowBatch runs in Chrome, Edge or Brave, version 116 or newer. It does not run in Safari or Firefox, and it does not run on phones.
Other extensions use a similar name. The correct listing is published by flowbatch267 and its web address ends in pbdadbojkilfpcdciiikackfeblmldmj.
Click "Add to Chrome", then "Add extension".
Chrome lists what the extension may touch: your Flow tab, your downloads and your tabs. Nothing else.
Pin it to your toolbar.
Click the puzzle-piece icon at the top right of Chrome, find FlowBatch, and click the pin beside it. Now the icon is always one click away.
Click the FlowBatch icon.
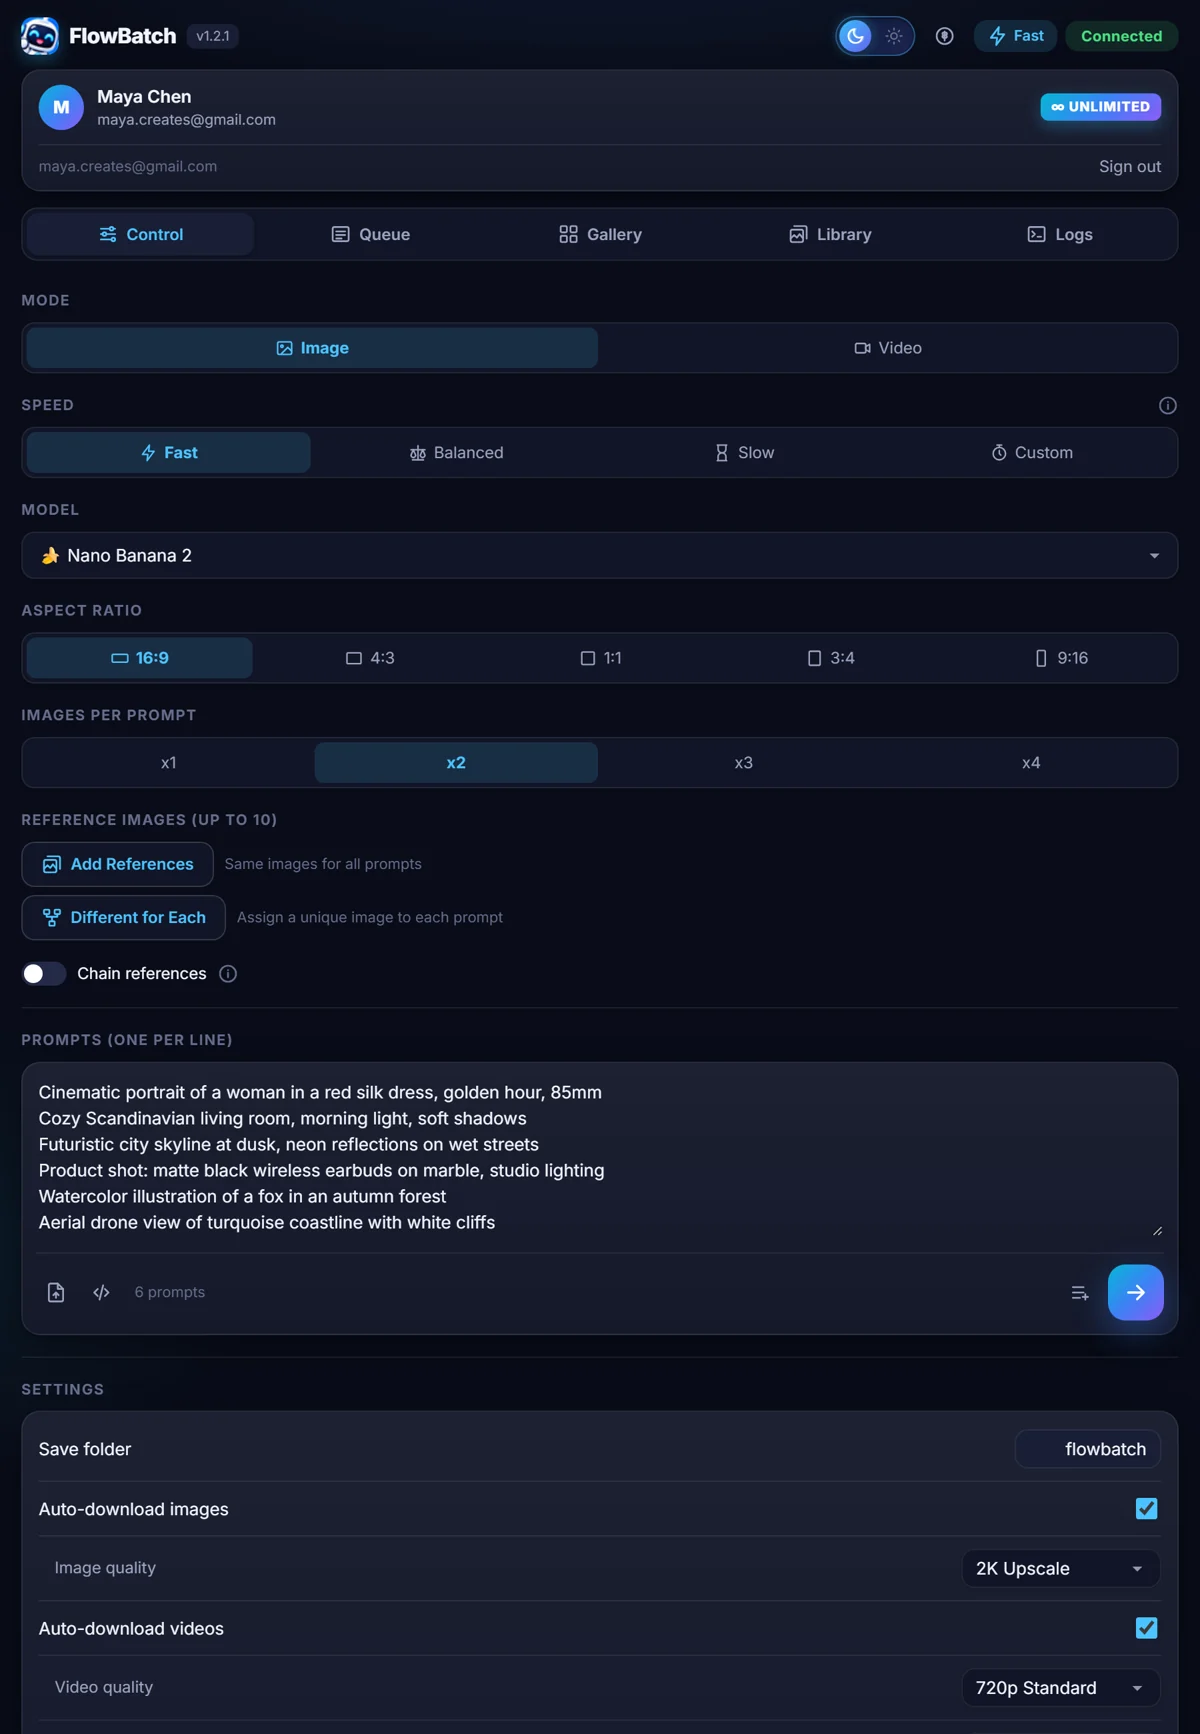
The panel slides in on the right. This side panel is the whole app. There is no separate window or website to keep open.
The panel on first open. Leave it open while you work.
Click the icon again to hide or show the panel. Your prompts, settings and gallery are kept either way.
Chrome sets the panel width, not FlowBatch. Drag the panel's left edge to make it wider.
02 Connect to Google Flow
Get the badge in the panel to say Connected.
Open flow.google.com in the same Chrome window.
FlowBatch works inside your own Flow tab, using your own Google session. It never asks for your Google password.
Sign in to Flow the way you normally do.
If you have never used Flow, generate one image by hand first so your account is set up.
Open a project, or create one.
Flow needs a project open. Everything FlowBatch makes goes into that project, exactly as if you had clicked Generate yourself.
Check the badge at the top right of the panel.
It should read Connected. Grey Disconnected means no Flow tab or no project. Running appears while a batch generates.
Click the badge for the checklist.
Flow Tab and Project Open each get a tick or a cross, so you can see what is missing. Any error from Flow is shown underneath, and Re-check looks again straight away.
Keep the Flow tab open while a batch runs.
Close it or navigate away and generation stops. Switching to other tabs is fine.
The older address labs.google/fx/tools/flow works too. If several Flow tabs are open, FlowBatch uses the one with a project.
03 Sign in to FlowBatch
One click, so your plan follows you to any computer.
Press "Sign in with Google" on the welcome screen.
This is your FlowBatch account. It is separate from your Flow login, but you use the same Google account for both.
Pick your account in the window Chrome opens.
FlowBatch receives your name, email and profile picture. It never sees your password, your prompts or your pictures.
Read the pill on the welcome screen.
During the launch period it reads "Launch offer, unlimited and free". Every signed-in account has no daily limit at all.
Look at the account card under the header.
Your picture, name, email and plan badge live there. During launch the badge reads ∞ UNLIMITED.
Sign out from the same card.
Your prompts, library and gallery stay on this computer. Only the account is signed out.
04 The 60-second tour
See where everything lives before you generate anything.
Press "Restart Tour" at the bottom of the Control tab.
The tour also runs by itself the very first time you open FlowBatch.
Read each pop-over and press Next.
Seven steps: Connection, Image or Video, Speed, Prompts, Different for Each, Downloads, and the tab bar. The control being explained is highlighted while the rest dims.
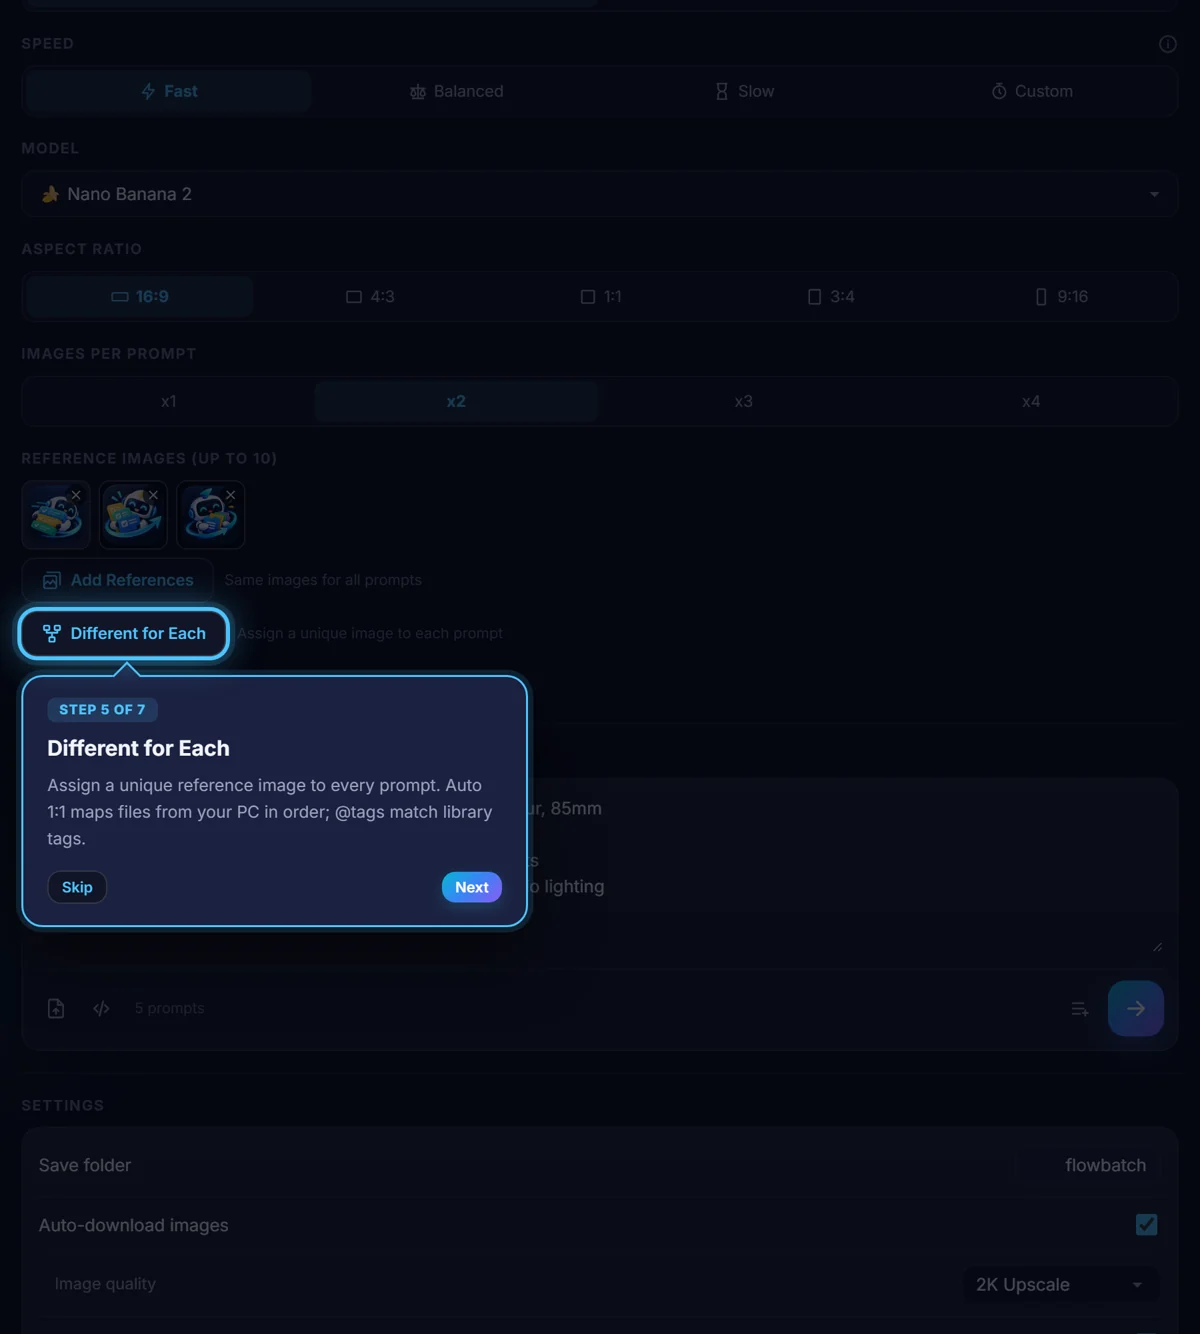
Press Skip whenever you like.
You can restart it from the same button at any time.
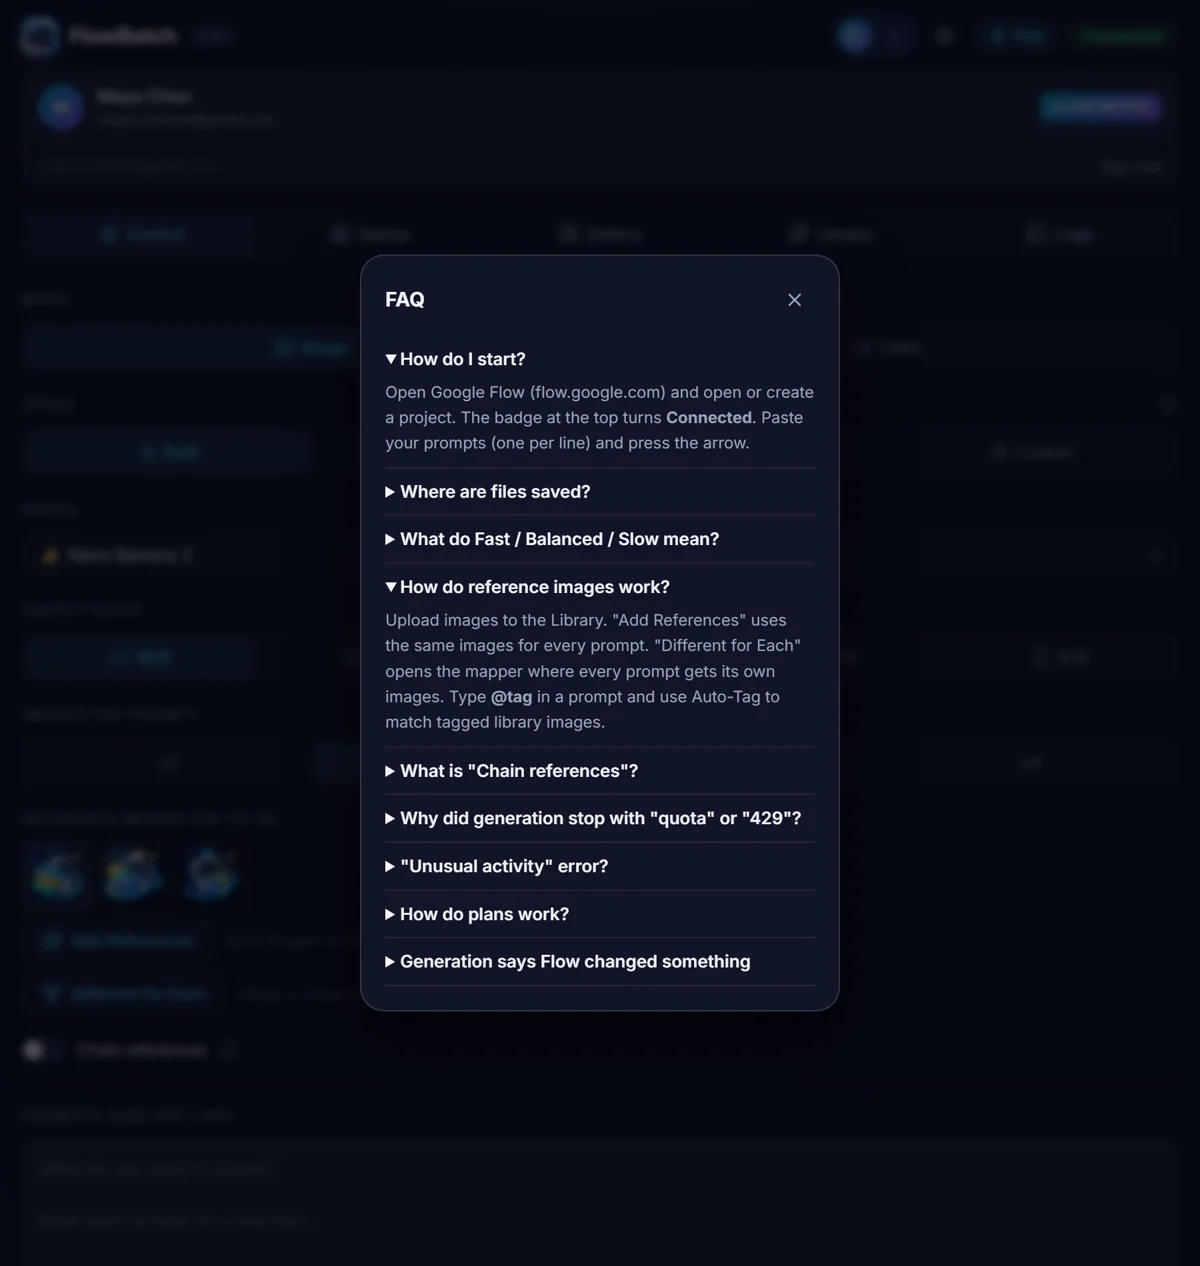
Press "FAQ" next to it for quick answers.
The FAQ covers the eight things people ask most, including where files go and what the speed modes mean.
05 Your first image batch
Turn a list of prompts into a folder full of images.
On the Control tab, make sure Image is selected.
Mode has two buttons, Image and Video. Each remembers its own settings.
Choose a model.
Nano Banana 2 is the default all-rounder, Pro is the highest quality, Lite is the fastest. These are Google's models and each has its own daily cap on your Google account.
Choose an aspect ratio.
16:9 for wide shots, 9:16 for Reels and Shorts, 1:1 for Instagram, plus 4:3 and 3:4.
Choose how many images per prompt.
x2 is the default, so each prompt gives you two pictures to choose from. x4 gives more choice and takes longer.
Leave Speed on Fast for now.
Fast runs three images at once. If Google starts throttling, FlowBatch eases off by itself.
Type one prompt per line in the Prompts box.
Press Enter between prompts. One line is one prompt. Do not leave blank lines.
Example list Cinematic portrait of a woman in a red silk dress, golden hour, 85mm Cozy Scandinavian living room, morning light, soft shadows Futuristic city skyline at dusk, neon reflections on wet streets Product shot: matte black wireless earbuds on marble, studio lighting Watercolor illustration of a fox in an autumn forest
Check the counter under the box.
It should match the number of prompts you pasted. If it does not, you have a blank line or a prompt split over two lines.
Press the round arrow at the bottom right of the box.
That is Start. The playlist icon beside it queues the batch for later instead of running it now.
Watch the progress bar.
It counts finished files against the total, and a red Stop button appears. Stopping keeps everything already generated.
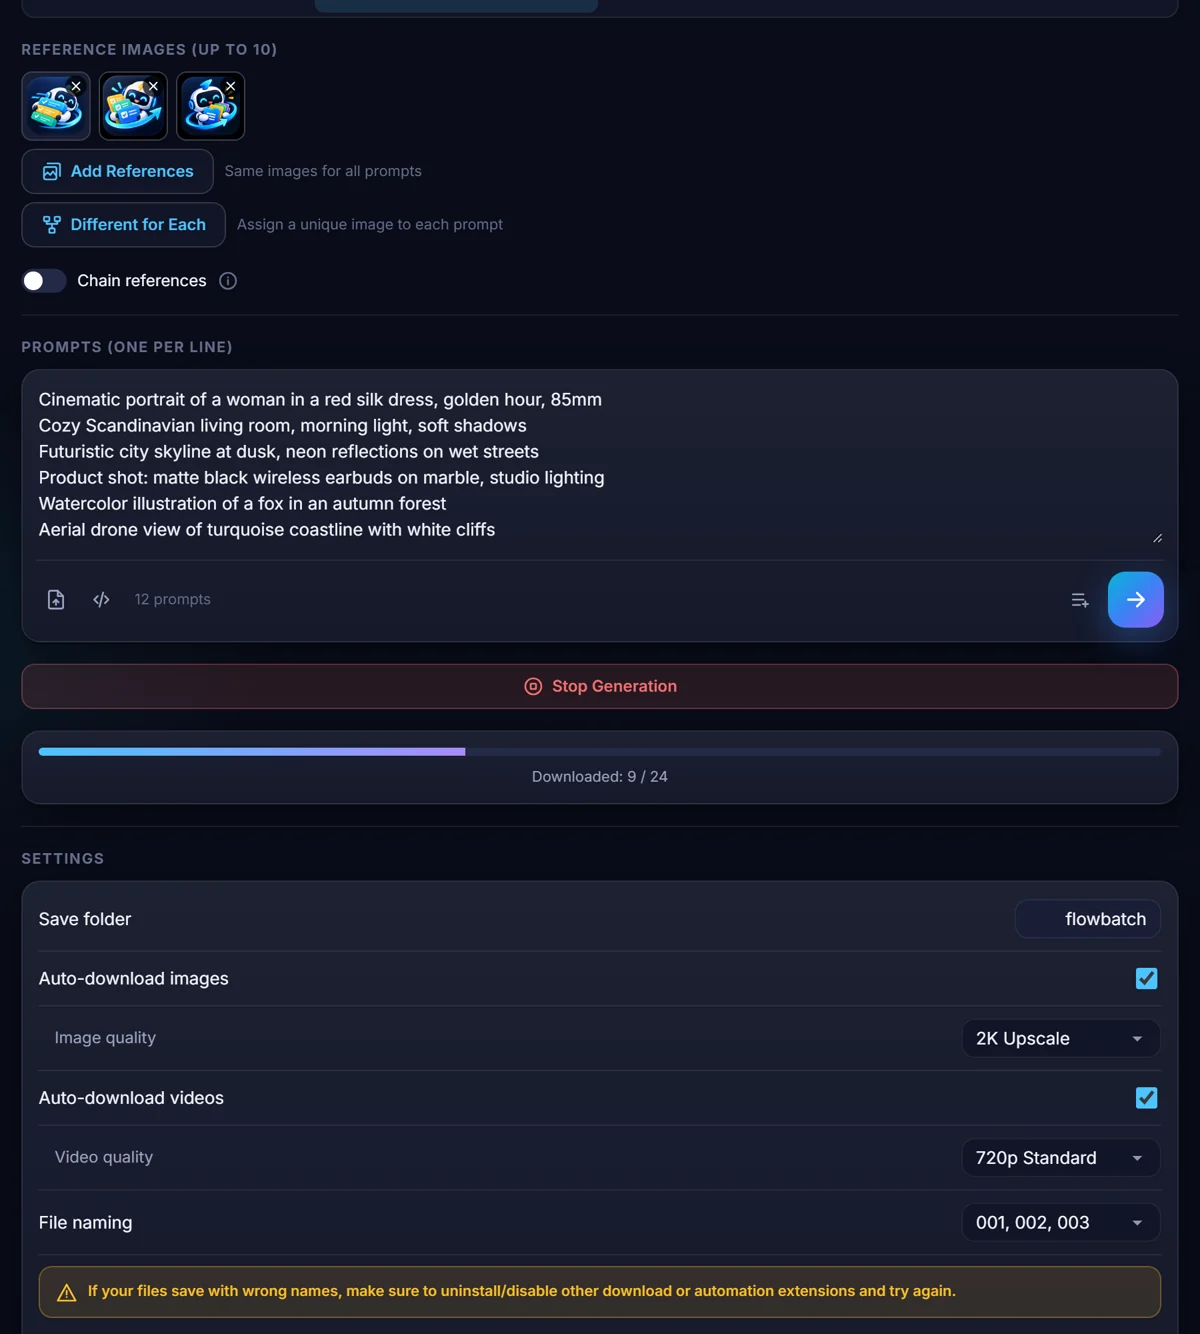
The panel jumps to the Gallery on its own.
Pictures appear as they finish, and each one is saved to your computer while the rest of the batch keeps running.
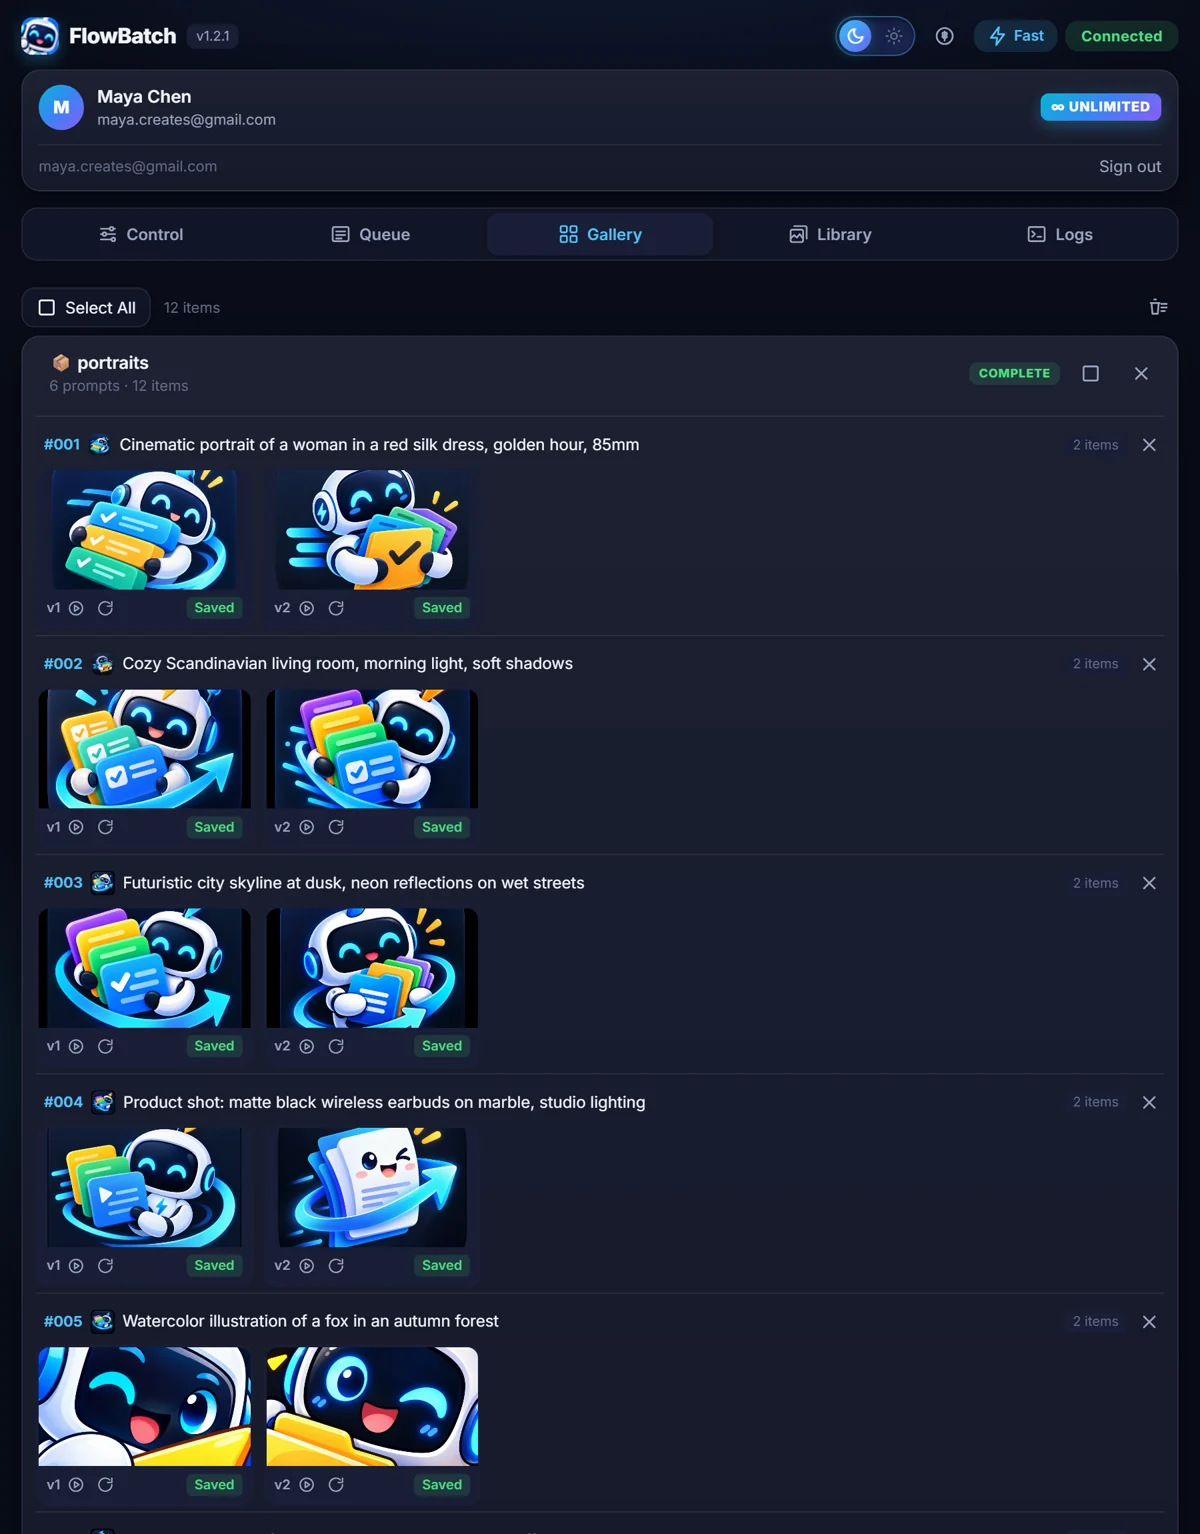
Start with three to five prompts your first time, so you see the whole cycle quickly. You can keep using Chrome normally while a batch runs.
06 The Gallery
Find, preview, select and re-download everything a batch produced.
Open the Gallery tab.
Everything FlowBatch has made is here, newest batch first, grouped by batch and then by prompt.
Read the group headers.
Each shows the batch name and whether it is Generating, Complete, Partial or Failed. Click a header to fold the group away.
A shimmering grey tile is still being made.
It turns into the real picture or clip as soon as Flow finishes it.
Click a tile for the large preview.
Use the side arrows or your left and right keys to flip through everything. Escape closes it. Hover a video tile to play it silently in place.
Select tiles with the tick in the corner.
Or press Select All. A bar appears at the bottom with Animate, Regenerate and Download.
Use Download to fetch a different size.
It re-downloads the same results at a new quality. Nothing is regenerated, so it costs you nothing.
Clear tiles you do not want.
The small x removes one, the broom empties the view. Files already saved to your computer are never deleted.
The Gallery keeps the most recent 600 items and lives only in this browser. If thumbnails turn grey, Google's preview links expired; FlowBatch refreshes them from your open Flow tab.
07 Where your files are saved
Know exactly which folder your images and videos land in.
Scroll to the Settings card on the Control tab.
These apply to the next batch you start. A running batch keeps the settings it began with.
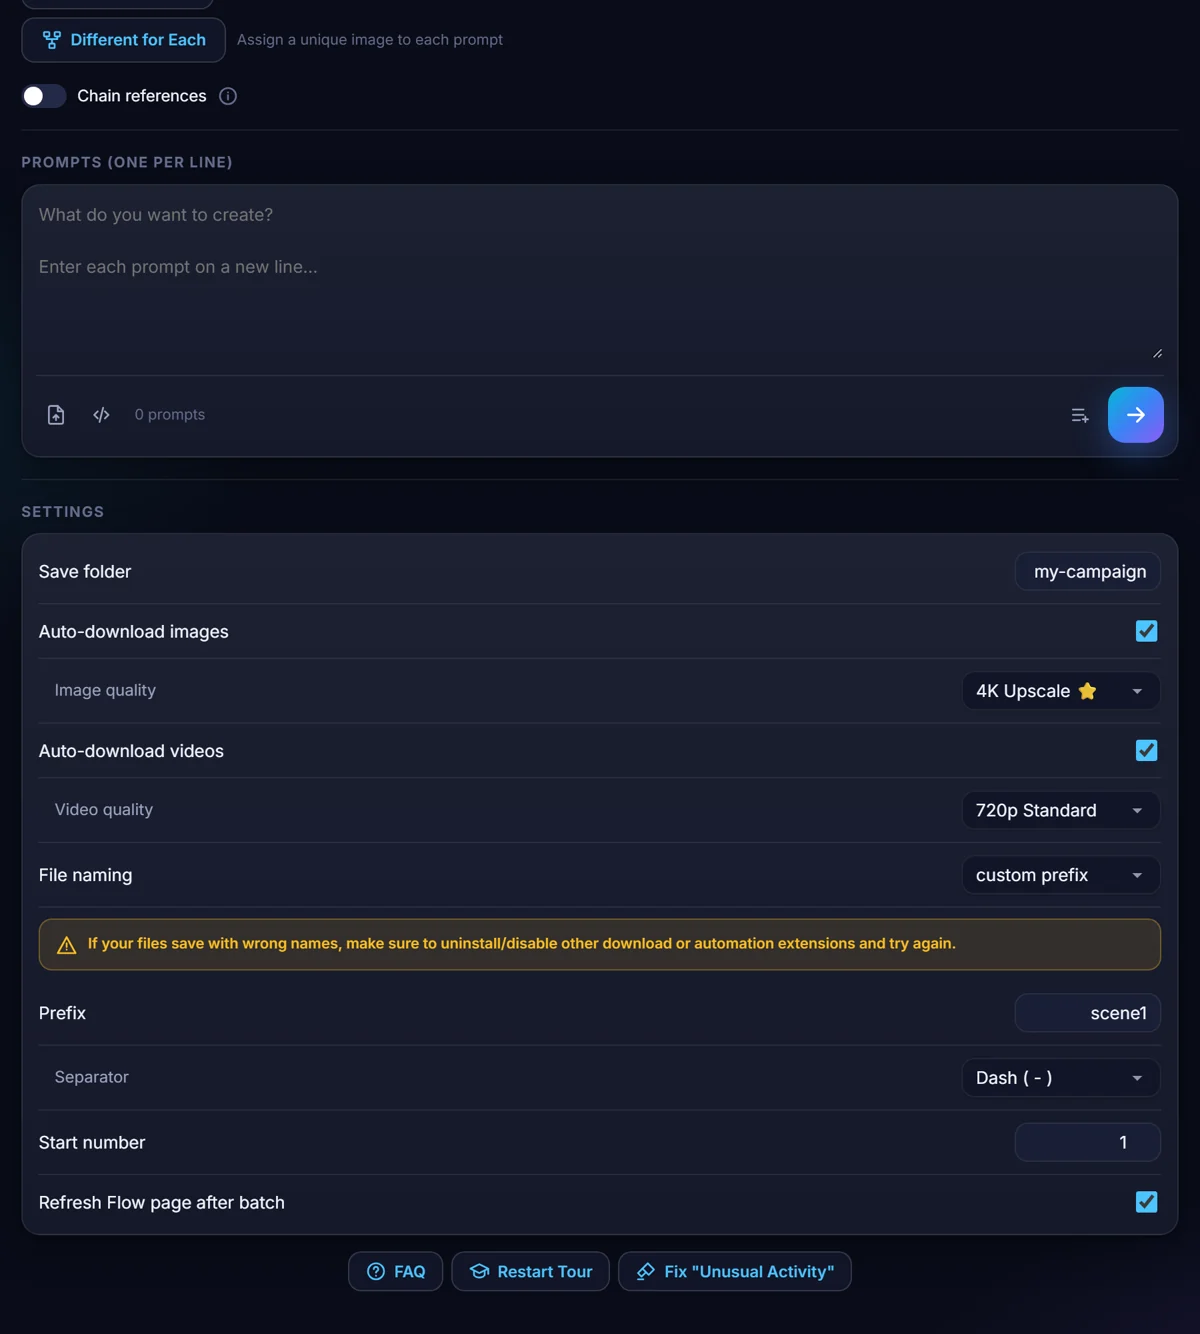
Type a name in "Save folder".
The default is flowbatch. Use something like scene-1 so each project gets its own folder. Spaces and capitals become dashes automatically.
Your files go to your normal Downloads folder.
Where files land Windows C:\Users\you\Downloads\my-campaign\ Mac ~/Downloads/my-campaign/
Leave the auto-download switches on.
Every result is then saved as soon as it is ready. Switch one off if you would rather look in the gallery and pick by hand.
Set image and video quality.
Images default to 2K Upscale, videos to 720p Standard. These decide what the automatic download saves.
Leave "Refresh Flow page after batch" on.
FlowBatch reloads your Flow tab once a batch ends, which keeps the session fresh for the next run.
Turn off Chrome's save prompt, once.
Open chrome://settings/downloads and switch off "Ask where to save each file before downloading". With it on, forty images means forty dialogs.
If another extension also renames downloads, numbering can come out wrong. Turn it off while a batch runs.
08 Name your files the way you want
So editing later is easy.
Find "File naming" in the Settings card.
Three choices: plain numbers, named after the prompt, or your own prefix.
Plain numbering.
The first prompt becomes 001, the second 002, in the order your prompts are listed.
Named after the prompt.
The first 30 characters of the prompt become a safe filename with the number appended.
Your own prefix.
Type something like scene1 and choose a separator: dash, underscore, dot or none.
Set a start number when adding to an existing folder.
Start at 41 and the first new file is 041, so it sorts after the forty already there.
Extra images get a letter.
One prompt, three images 001.png 001b.png 001c.png 002.png
They stay next to each other when the folder is sorted by name.
09 The Queue
Prepare several batches with different settings and let them run one after another.
Build a batch, then press the playlist icon instead of the arrow.
It is added to the Queue with everything it needs: prompts, model, ratio, references, folder and naming.
Change the settings and add another.
Each queued batch keeps its own settings, so one can be 16:9 images and the next 9:16 video into a different folder.
Open the Queue tab.
Every batch is a row with its name, its prompt count and a progress bar. Expand one to see each prompt's status.
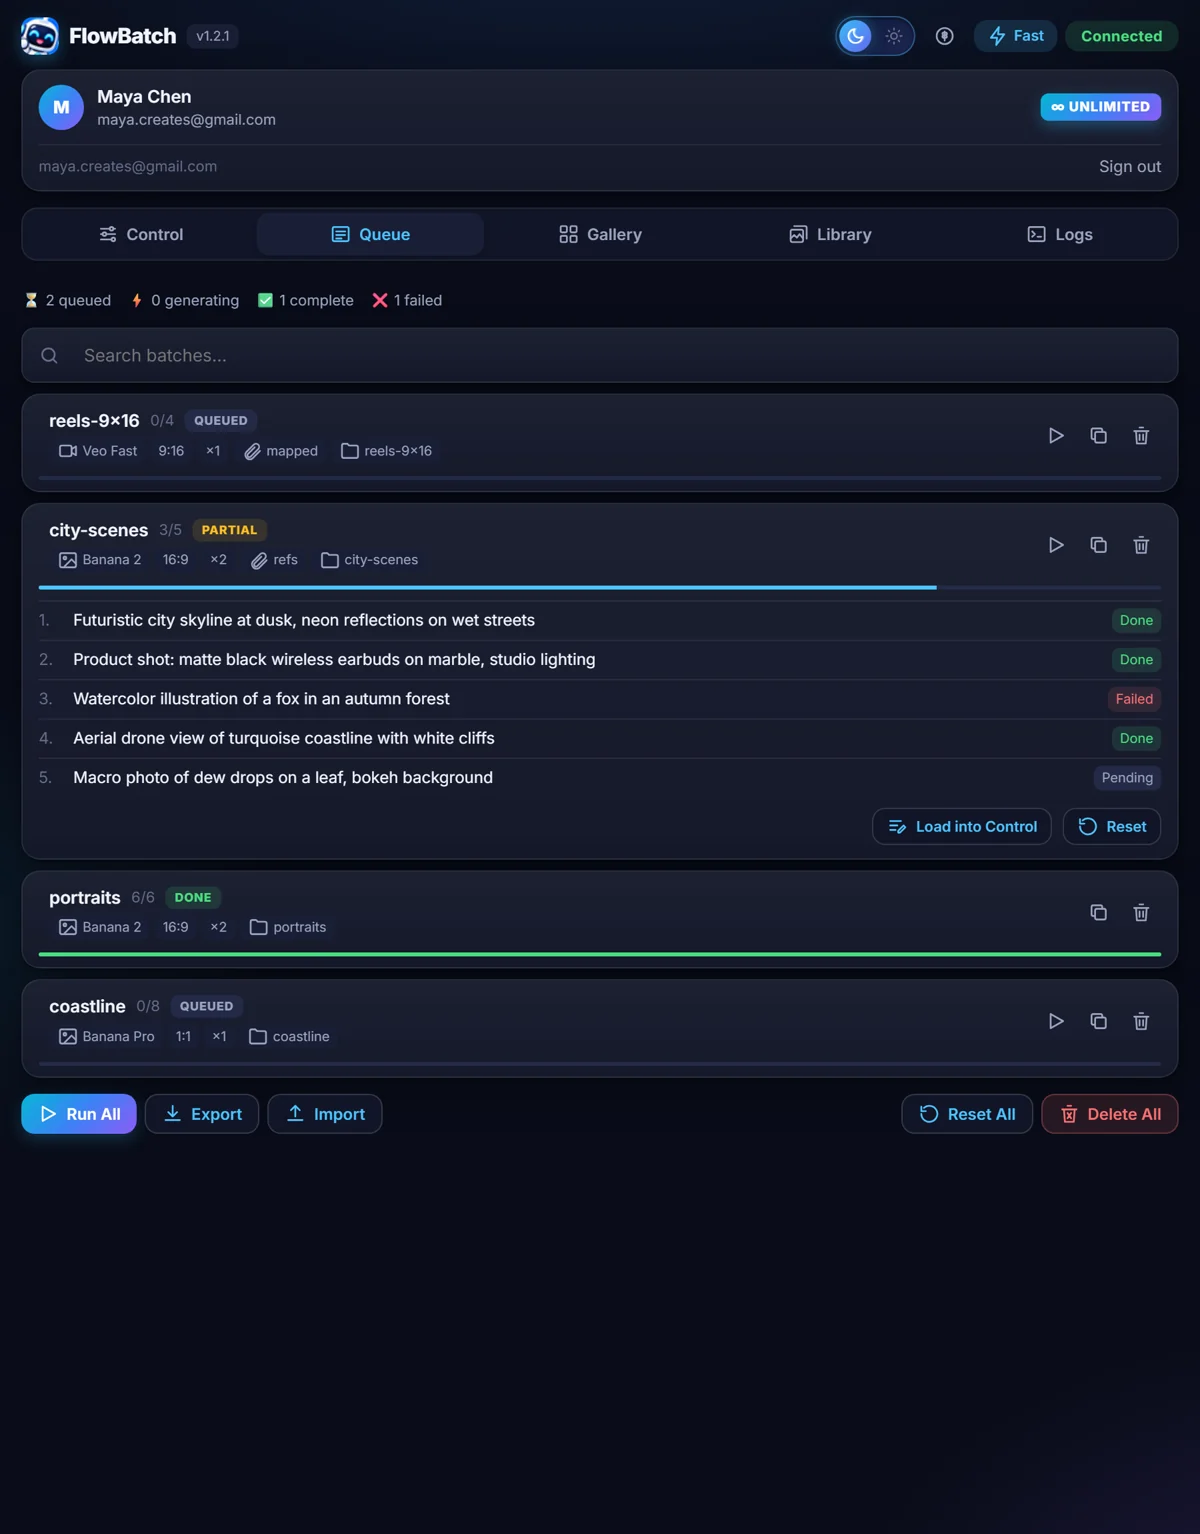
Run one batch, or run them all.
Run on a row generates just that batch. Run All works down the list in order.
Load a batch back into Control.
Its prompts and settings are restored so you can edit and re-queue it.
Clone, Reset, Delete.
Clone duplicates a batch, Reset marks every prompt pending again, and Delete offers six seconds of Undo.
Search when the list gets long.
The search box matches batch names and words inside prompts.
A queued batch stores the settings it had when you queued it. Changing the Control tab afterwards does not change it. Queued batches survive restarting Chrome.
10 Import prompts, export your work
Bring prompts in from a file and move whole batches between computers.
Import a .txt of prompts.
Press the file icon above the prompt box. One prompt per line, blank lines ignored.
Or import JSON.
Both shapes work ["first prompt", "second prompt"] {"prompts": ["first prompt", "second prompt"]}Check the counter after importing.
It tells you how many prompts were actually read, which catches a stray blank line or a broken bracket.
Export the whole queue.
The Export button on the Queue tab gives you one dated JSON file with every batch and its settings.
Import it on another computer.
The batches appear in the Queue ready to run.
Know the limits.
Up to 500 batches, 1000 prompts per batch and 5000 characters per prompt. Anything beyond that is dropped rather than loaded.
An export holds prompts and settings, not your reference images or generated files.
11 The Image Library
Upload the pictures you reuse, and label them so FlowBatch can find them.
Open the Library tab and press Upload.
Select as many files as you like. JPEG, PNG and WebP all work.
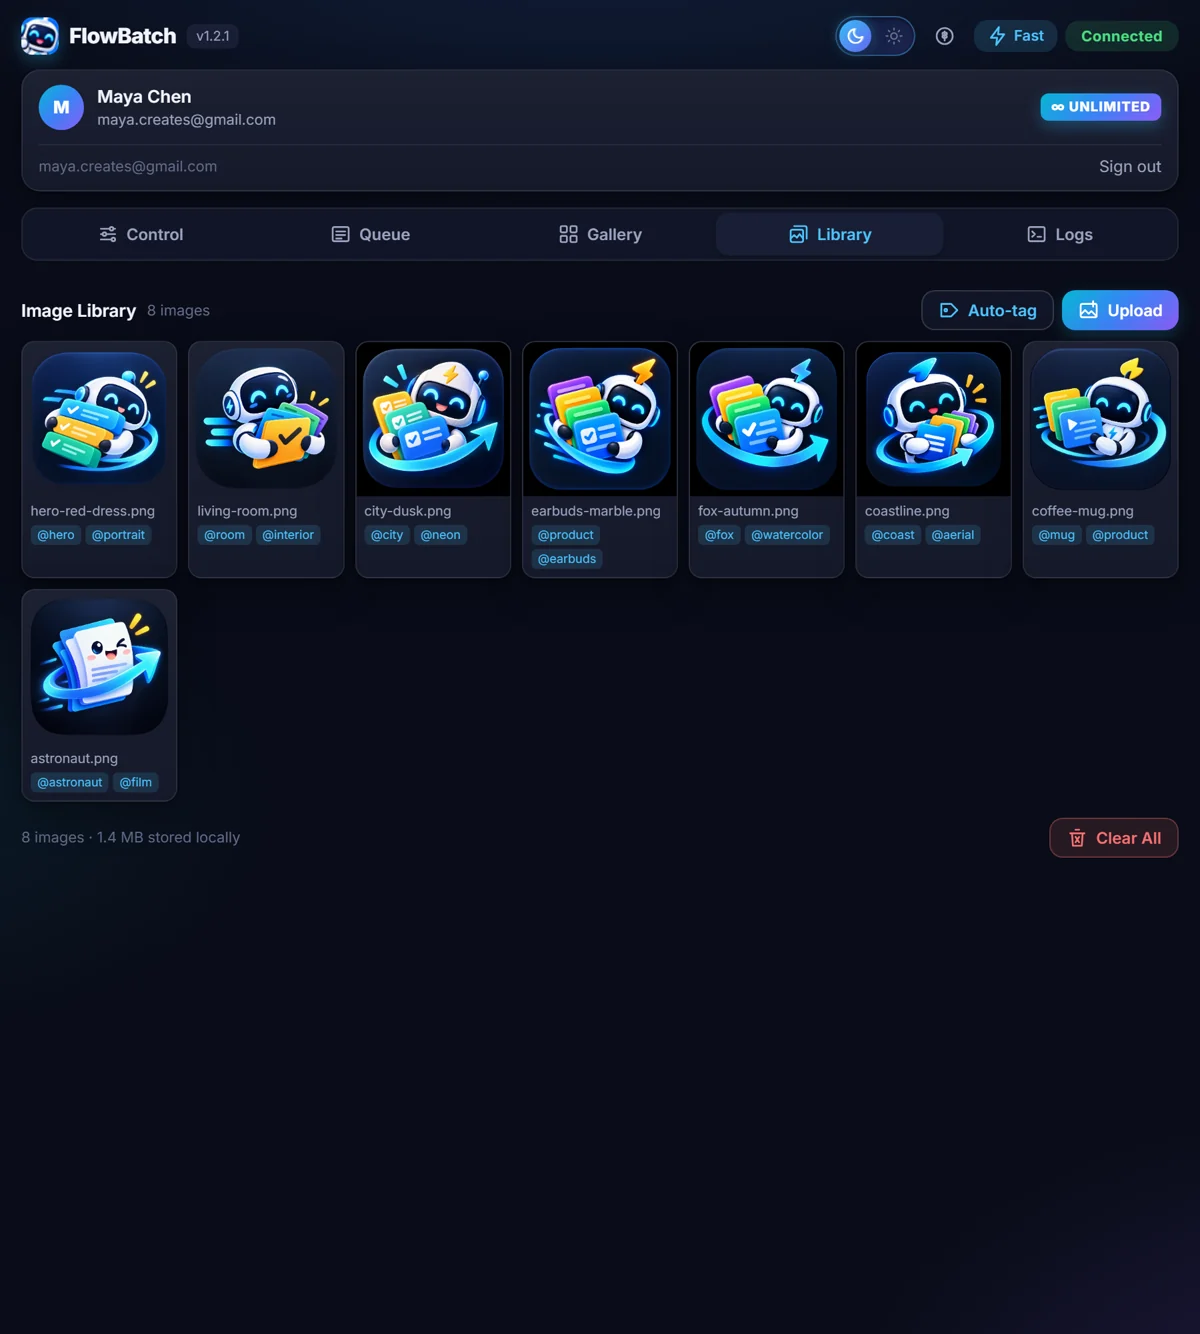
Wait for the thumbnails.
FlowBatch keeps a small thumbnail and a working copy no larger than 1280 pixels on its longest side. Your original file is untouched.
Tag an image.
Click the tag field under it and type one word. Tags are how a prompt refers to a picture: tag it maya and write @maya in a prompt.
Or press Auto-tag.
Every untagged image gets a tag made from its filename, so maya-red-coat.png becomes maya-red-coat. Name your files well and you never tag by hand.
Watch the storage line at the bottom.
It shows how much space the library uses on this computer. Nothing is uploaded to us.
Library images are uploaded to Flow only when a prompt needs one, and only once per Flow project. Repeat runs reuse the upload.
12 Reference images for a whole batch
Use the same picture or pictures as a style or character reference everywhere.
Press "Add References" on the Control tab.
The picker opens showing your library.
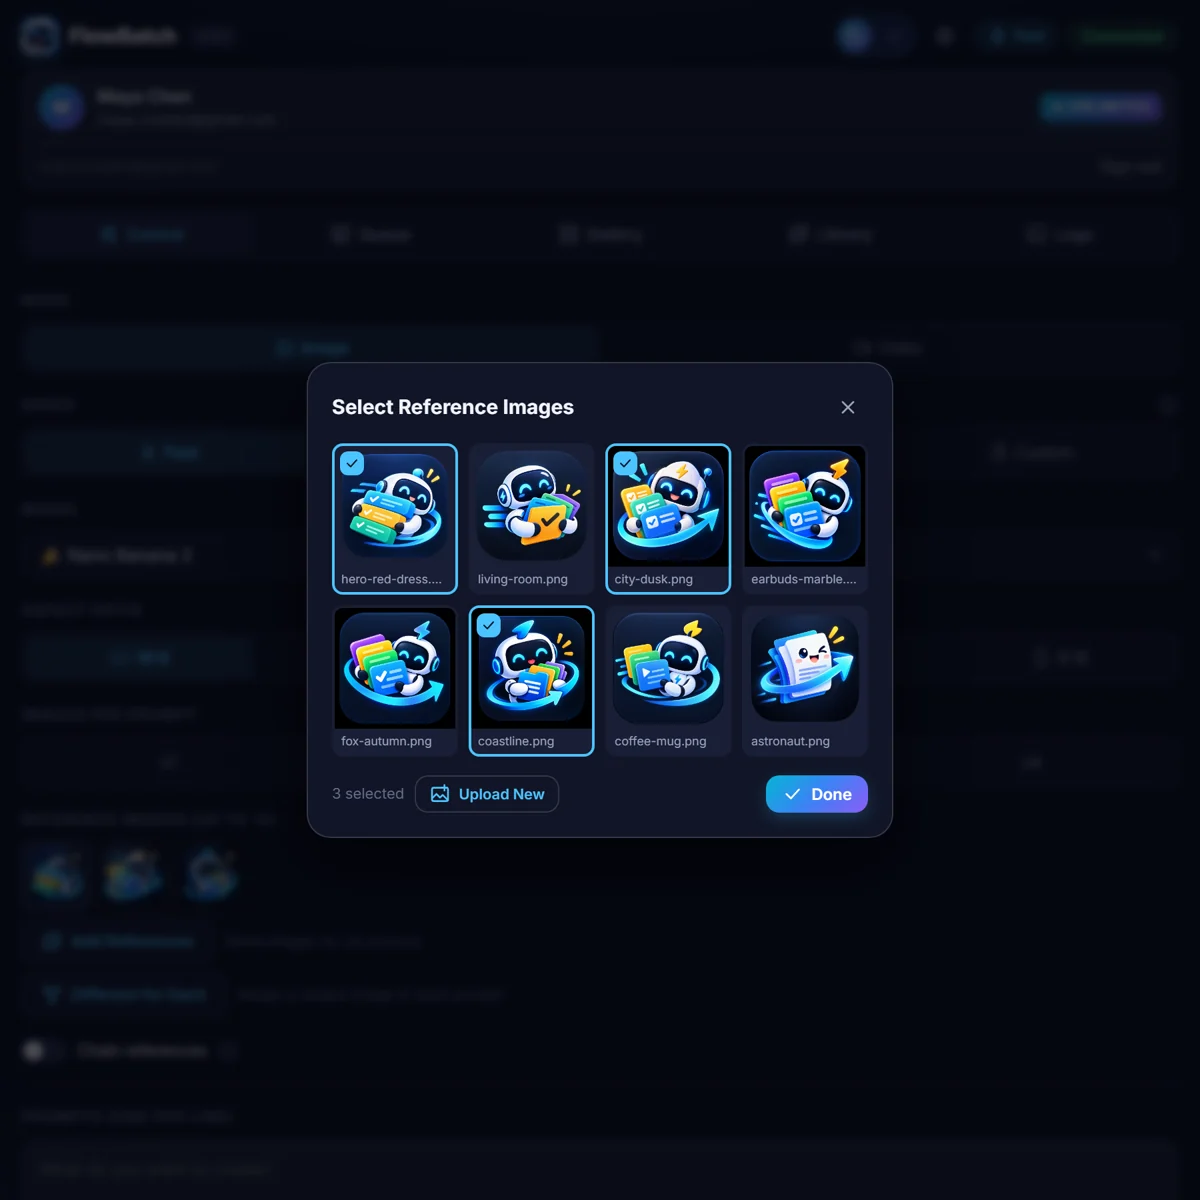
Click the pictures you want, then Done.
Up to 10 in Image mode. They appear as thumbnails on the Control tab.
The hint beside the button says "Same images for all prompts".
Every prompt in this batch gets exactly these references.
Upload a new file from inside the picker.
It joins your library at the same time, so it is there next batch.
For video, choose the Ref mode first.
Video reference mode takes up to 3 images rather than 10.
References keep a character, a wardrobe or a look consistent. They do not copy an image exactly. For a different picture per prompt, see the next chapter.
13 Different for Each
Give every prompt its own reference picture, on one screen.
Type or import your prompts first.
The mapper builds one row per prompt, so it needs the list before you open it.
Press "Different for Each".
A full-height screen opens with every prompt on its own row and space for its images.
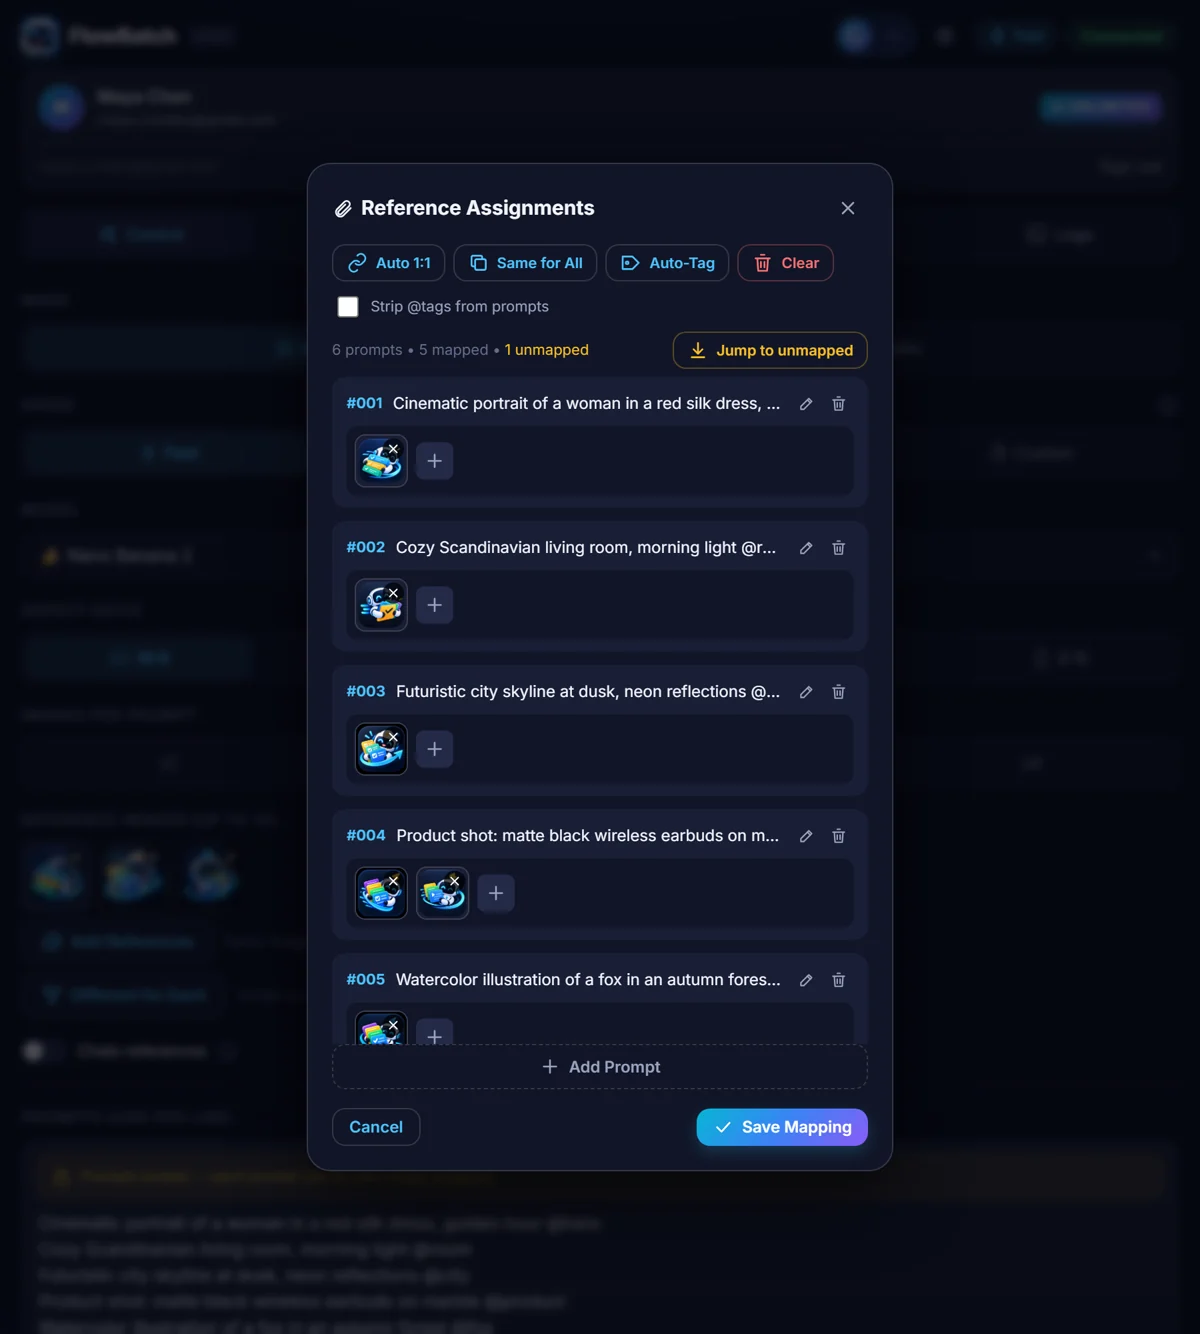
Press "Auto 1:1" to map a whole folder at once.
Choose the files from your computer. FlowBatch sorts them by the numbers in their names, adds them to your library, and pairs the first with the first prompt, the second with the second.
Or add images row by row with the + button.
The picker opens for that row only.
"Same for All" fills every row with the same set.
A useful starting point before you change a few rows by hand.
Edit a prompt's text right in its row.
You do not have to close the mapper to fix a typo. Add Prompt adds a row, the bin removes one, and numbering fixes itself.
Watch the counter.
It reads something like "12 prompts, 9 mapped". If rows are still empty, a "Jump to unmapped" button takes you to the first one.
Press "Save Mapping".
The mapper closes, the prompt box locks so the rows stay lined up, and a preview appears showing each prompt with its picture.
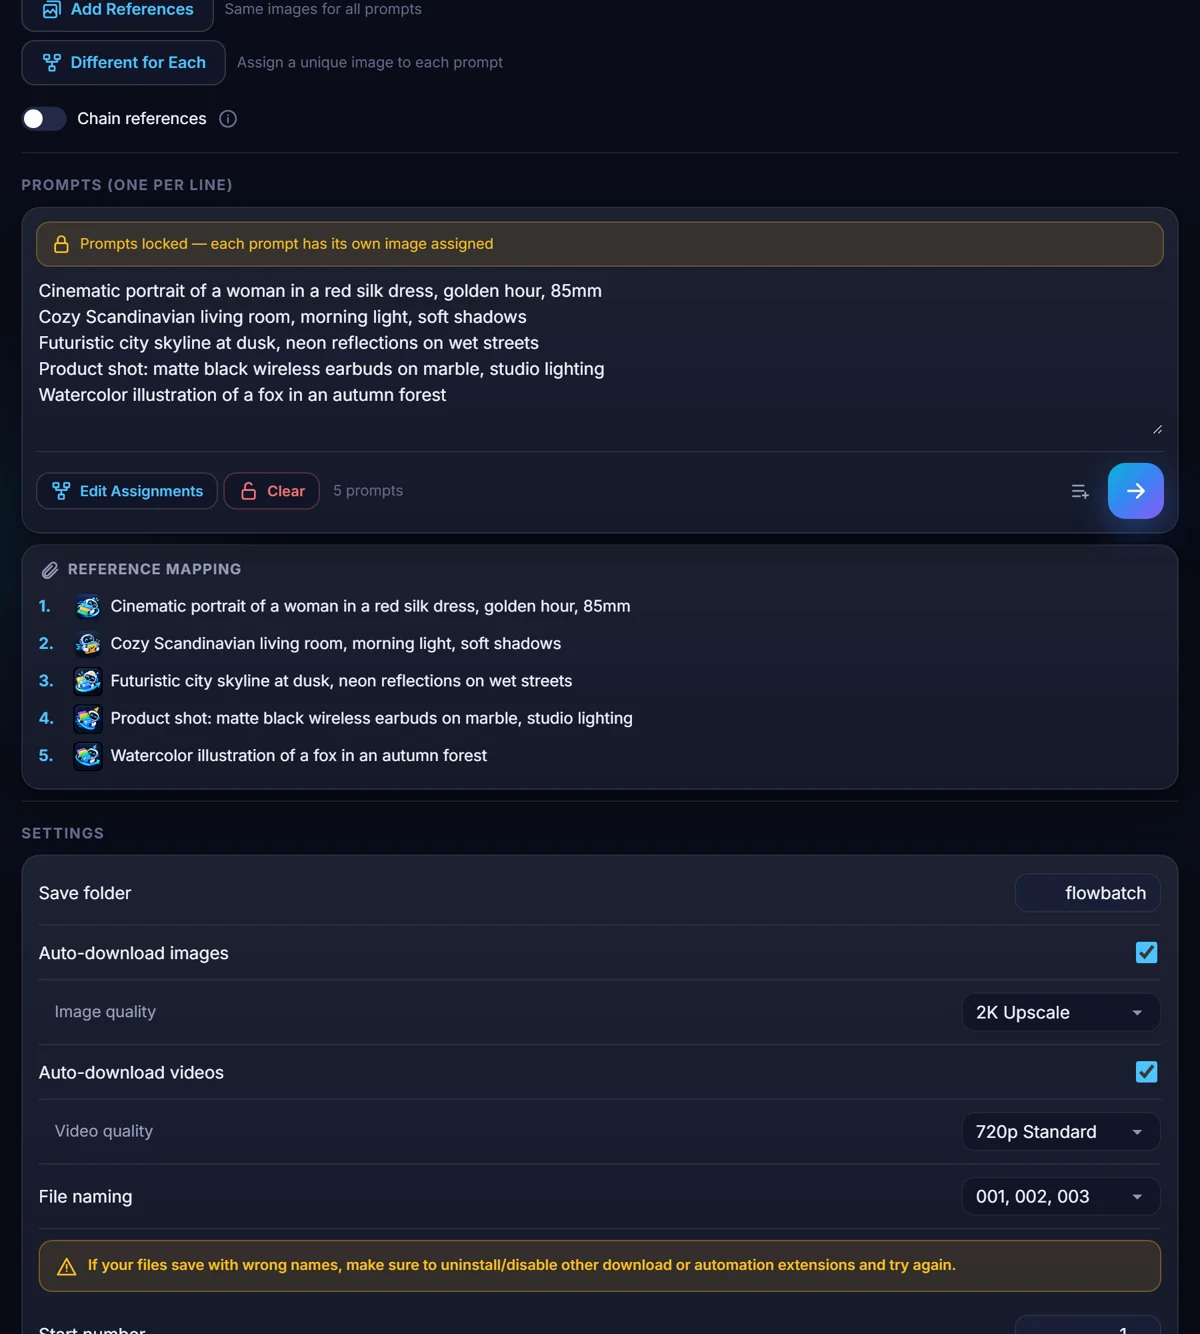
Change it later with "Edit Assignments".
"Clear" drops the mapping and unlocks the prompt box.
In Video with Start frame selected, the first image on each row becomes that clip's start frame.
14 @tags and auto-tagging
Let FlowBatch match pictures to prompts by a word you type.
Tag your library images first.
By hand, or with Auto-tag. A tag is one word: maya, red-coat, studio-a.
Write that word in the prompt with an @ in front.
Tagged prompts @maya walking through a night market, neon signs @maya @red-coat on a rooftop at sunrise @studio-a product shot, soft key light
Open "Different for Each" and press Auto-Tag.
Every prompt is scanned for @word and each library image whose tag matches is attached to that row.
Check the rows.
Image mode attaches up to 10 per row, video reference mode up to 3, and video start-frame mode uses the first match as the start frame.
Switch on "Strip @tags from prompts".
The tag words are removed from the prompt text when you save, so Google is asked for "walking through a night market" and never sees the tag.
Tags match whole words, and hyphens count as part of the word, so @red-coat and @red are different tags.
15 Chain references
Make each new image continue the look of the one before it.
Switch on "Chain references" in Image mode.
A hint appears: each image becomes the reference for the next, and the batch runs one prompt at a time.
Choose "First Image Only".
Your attached reference seeds the first prompt. After that each new image carries the look forward on its own.
Or choose "Fixed on all".
Your chosen references stay attached to every prompt as well as the chained image. That holds a character tighter and leaves less room to change.
Expect it to take longer.
Chained batches cannot run in parallel, because each prompt needs the picture before it. The Speed setting does not change that.
Let it retry.
A failed step is retried up to three times. If five steps fail in a row the batch stops rather than burning your quota, and the Logs say why.
For video, use "Continue from last frame".
It is the video equivalent: the last real frame of each clip becomes the next clip's start frame.
Chaining drifts less than plain prompting, but it still drifts over a long list. Ten to twenty prompts is a comfortable run.
16 Video batches and the four video modes
Generate many clips at once, with or without start images.
Press Video under Mode.
Video keeps its own settings, separate from Image.
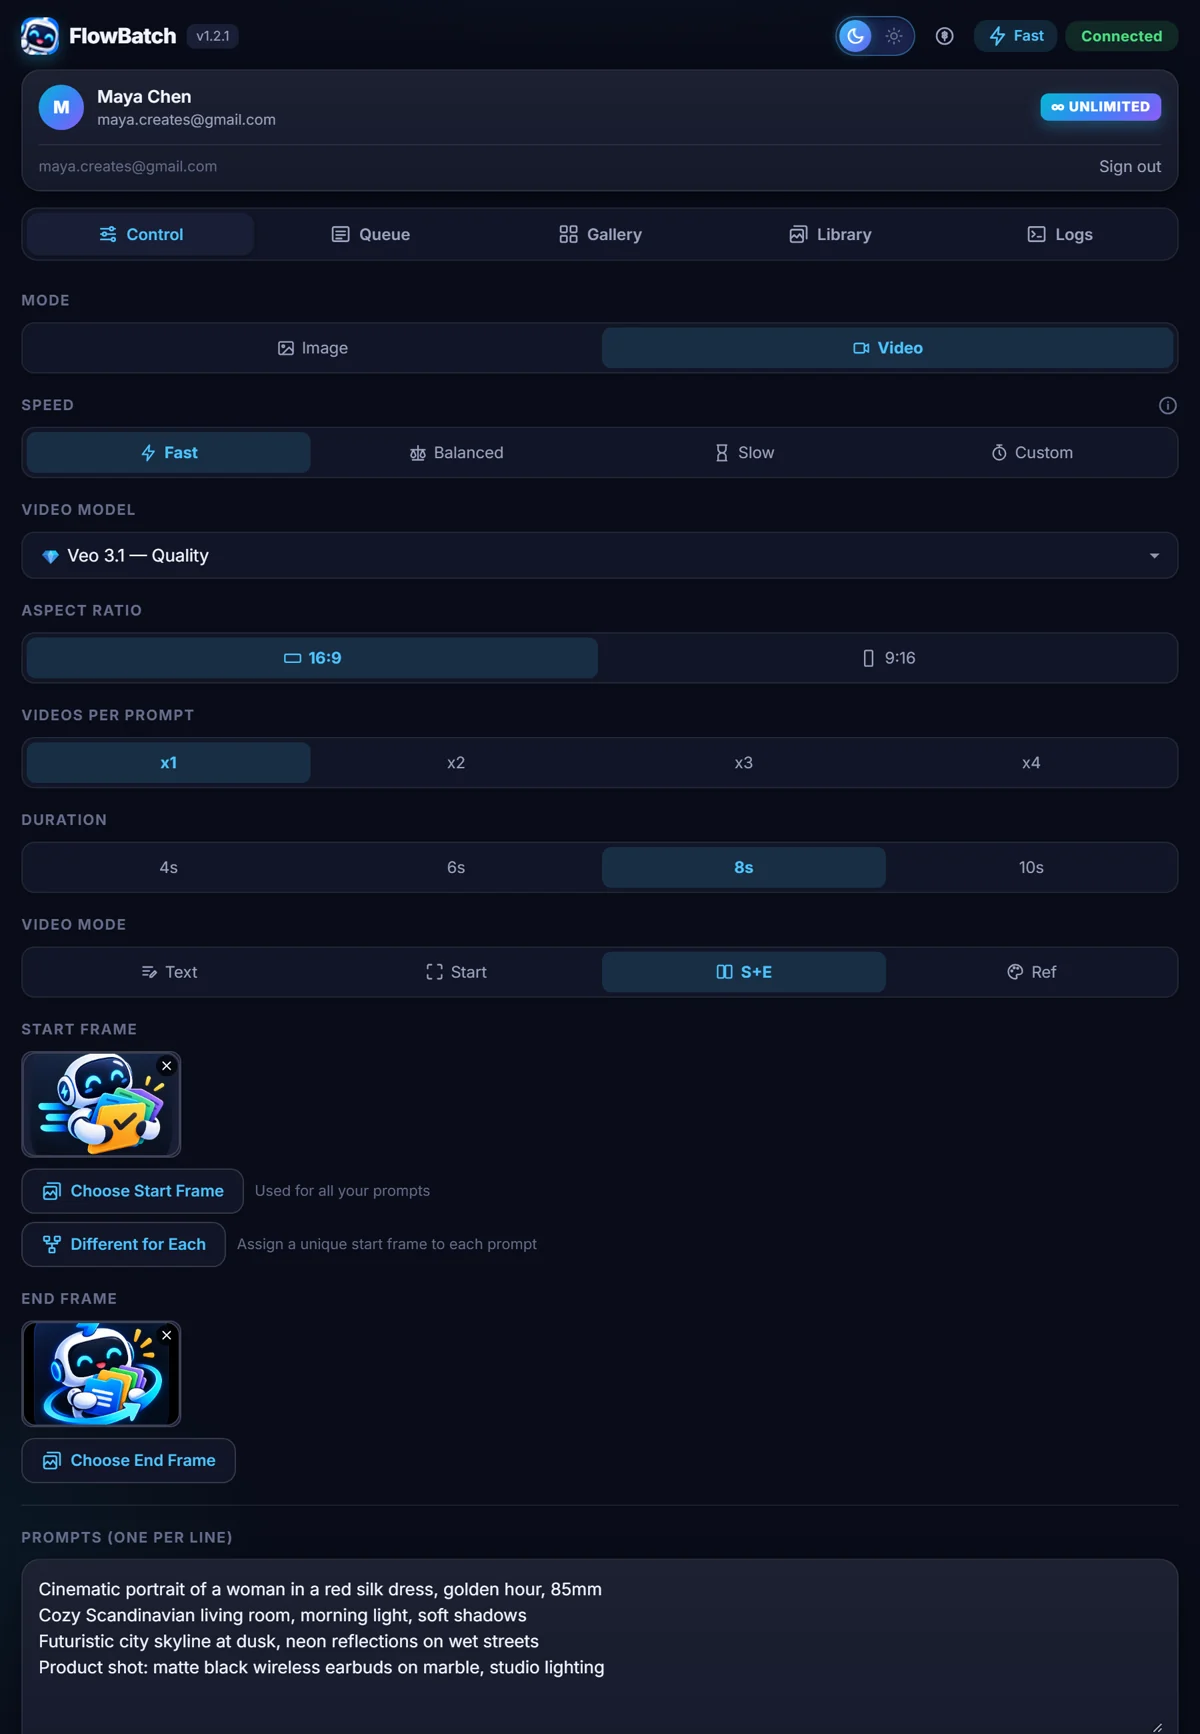
Choose a video model.
Omni Flash, or Veo 3.1 in Lite, Fast and Quality. The Lower Priority options wait longer in Google's queue.
Choose ratio, count and duration.
16:9 or 9:16, up to four clips per prompt, at 4, 6, 8 or 10 seconds.
Text: a clip from words alone.
The default mode.
Start: animate a picture.
Choose one start frame for every prompt, or use Different for Each to give every prompt its own.
S+E: morph between two pictures.
Choose a start frame and an end frame, and Flow makes the clip that travels between them.
Ref: keep a character or style consistent.
Up to three reference images, shared or mapped per prompt.
Use "One prompt mode" when every clip shares an instruction.
It appears above the prompt box once start frames are mapped. Write "slow push in, handheld" once and it applies to all of them.
Use "Continue from last frame" for one long shot.
Each clip starts on the final frame of the one before, so several eight-second clips read as one continuous take. These run one at a time.
Press the round arrow and let it run.
Video takes minutes per clip. FlowBatch polls each one until Flow says it is done, then downloads it.
Video spends Google Flow credits from your own account. The coin icon in the panel header shows how many you have left. FlowBatch never adds or spends credits of its own.
17 Upscaling and quality
Get the biggest, sharpest file your Google plan allows.
Set "Image quality" in the Settings card.
2K Upscale is the default, 4K Upscale is bigger, Standard saves the file exactly as Flow made it.
Set "Video quality" the same way.
720p Standard, 1080p Upscale or 4K Upscale.
4K needs Google AI Ultra.
Where FlowBatch knows your account cannot do 4K, the option is greyed out. Where it cannot tell, Google refuses and FlowBatch falls back on its own.
Know the fallback order.
Images go 4K, then 2K, then the standard file. Videos go 4K, then 1080p, then the original. You always end up with a file.
Expect upscaling to add time.
An upscaled video is re-rendered by Google and polled for up to ten minutes. 4K video downloads run strictly one at a time.
Re-download at another size whenever you like.
Select items in the Gallery, press Download, pick the size. Nothing is regenerated.
18 Animate and Regenerate
Turn finished images into clips, or try the same prompts again.
Select images in the Gallery.
Tick the tiles you want, or Select All and untick the rest.
Press Animate.
FlowBatch copies each image into your library, registers it with your current Flow project, switches to Video with Start frame selected, and builds a batch where each image is the start frame of its own clip.
Write the motion instruction.
Give each clip its own prompt, or switch on One prompt mode and write one for all of them.
Press Regenerate to try prompts again.
A new batch is built from those prompts, reusing the original model, ratio, count and reference mapping. It is named after the original with "(regen)" added, so you can compare.
Animate needs your Flow tab open with a project active, because it registers the images with that project.
19 Speed modes
Balance how fast you generate against how often Google pushes back.
Find the Speed row at the top of the Control tab.
Fast, Balanced, Slow, Custom. The current mode also shows as a badge in the header.
Fast: three images at a time, or two videos.
The default, and fine on a healthy account.
Balanced: two images, one video.
A gentler pace that trips Google's limits less often.
Slow: one at a time.
The safest setting when Google keeps throttling you.
Custom: one at a time with your own wait.
Anything from 1 to 60 seconds between prompts.
Speed also limits downloads.
Whatever you pick, FlowBatch slows itself when Google answers with a rate limit, and speeds back up when the pressure lifts.
Fast is not more quota. It uses the same quota sooner. Chained image batches and "Continue from last frame" always run one at a time.
20 The Logs tab
See what happened, and copy it when you need help.
Open the Logs tab.
Every step is written down as it happens: prompts submitted, uploads, retries, downloads and errors.
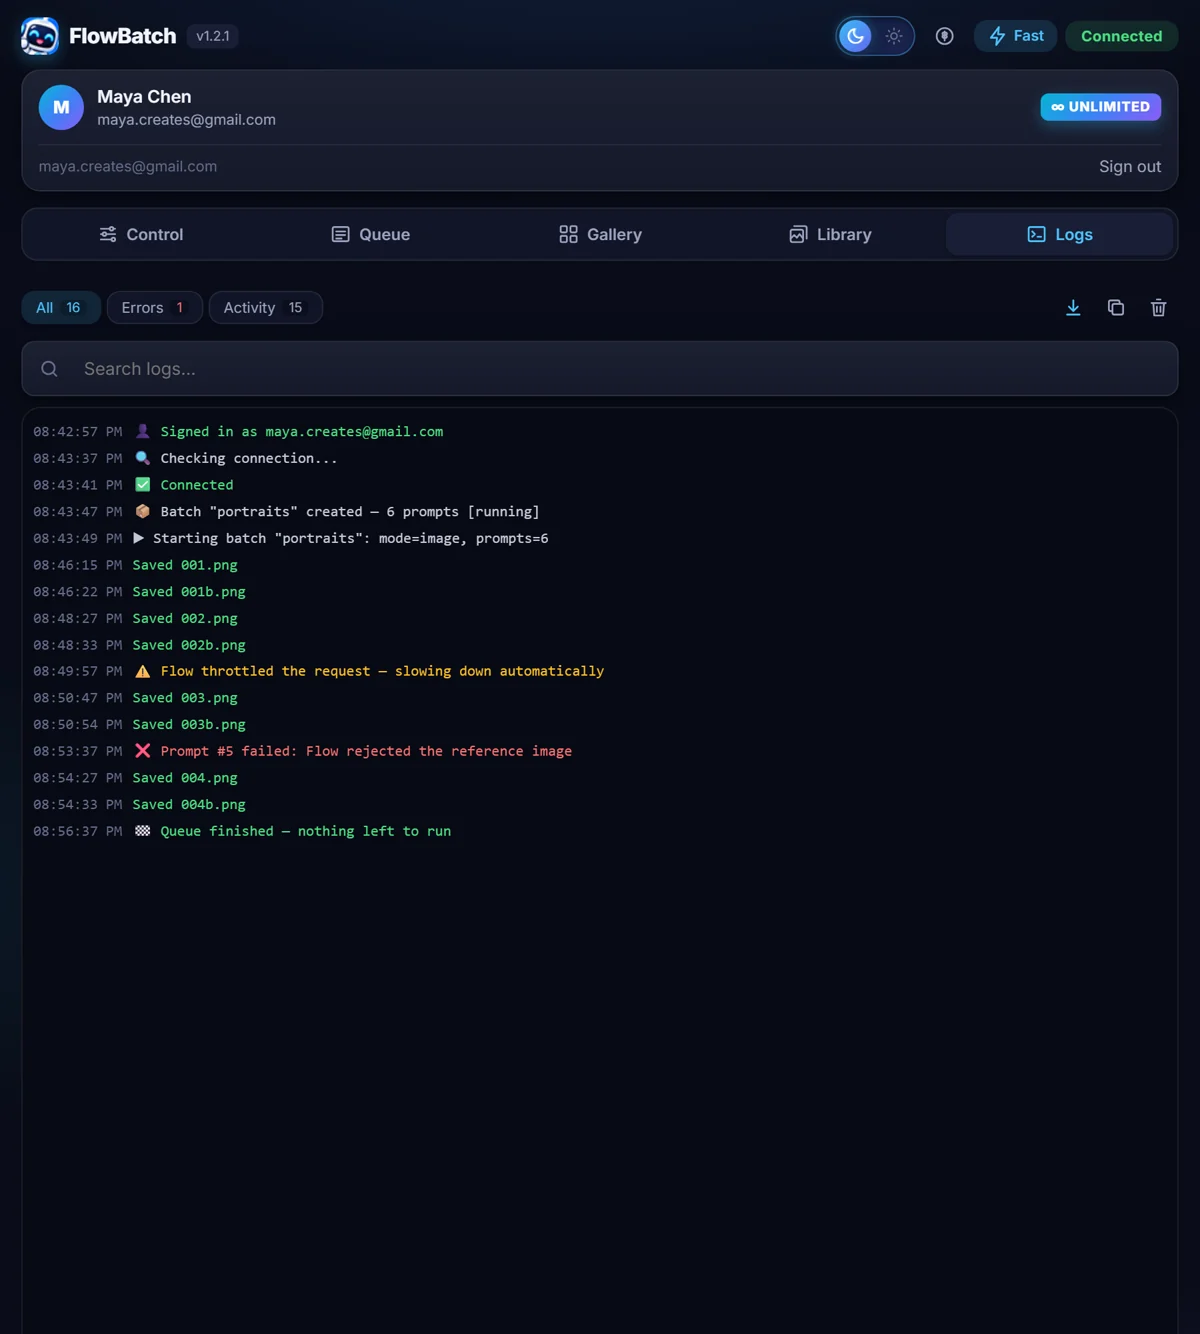
Search to find a prompt or an error.
Type part of a prompt, a filename, or a code like 429.
Leave auto-scroll on to follow a run.
Switch it off to read back without the list jumping.
Press the copy icon before asking for help.
The log is the single most useful thing you can send us.
Google's own error messages appear here word for word, which is how you tell a FlowBatch problem from a Google one.
21 Light or dark, and the header
Make the panel comfortable, and know what the header buttons do.
Press the sun and moon switch in the header.
The panel changes between the deep navy dark theme and the quiet near-white light theme. Your choice is remembered in this browser.
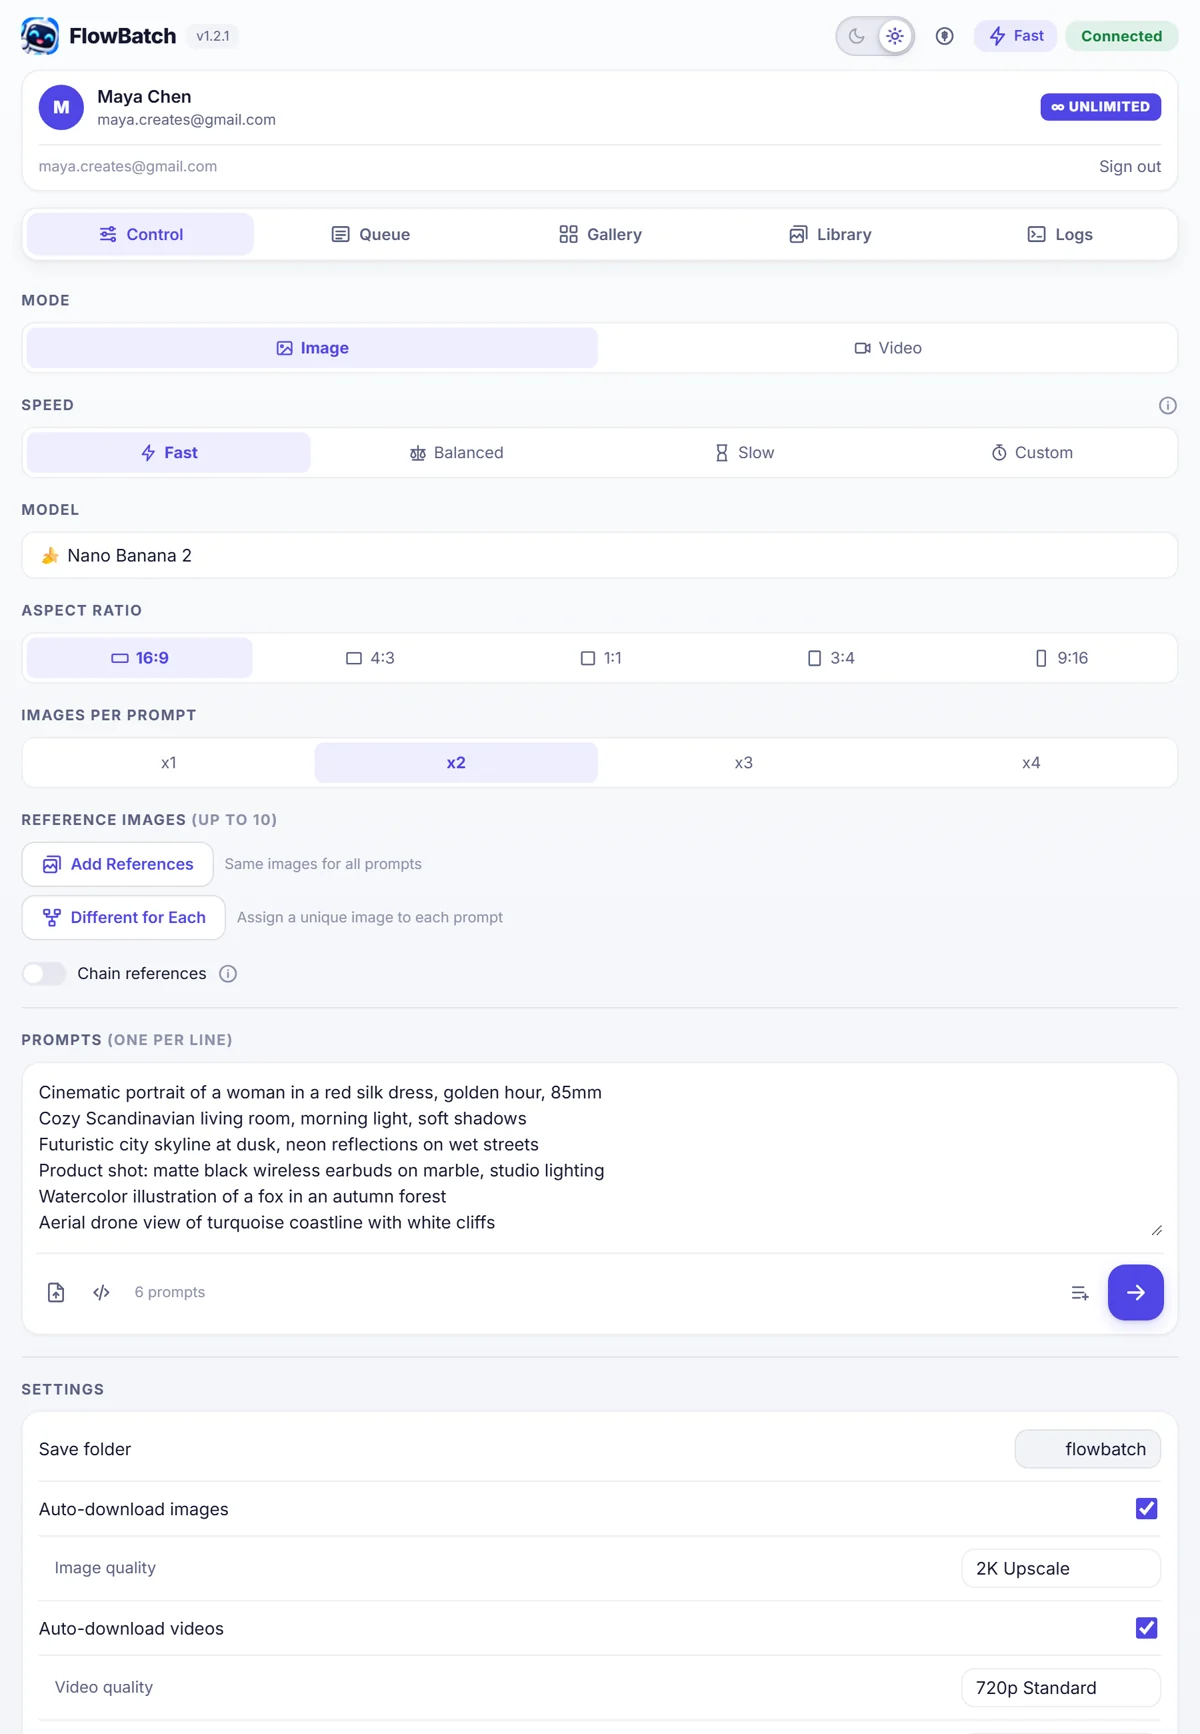
Watch the connection badge beside it.
Connected, Disconnected or Running, with the two-item checklist behind a click.
Check the coin icon for your Flow credits.
These are Google's credits, spent by Flow on video generation. FlowBatch only shows the number.
Use the five tabs.
Control is where batches are built. Queue, Gallery, Library and Logs are where their results live.
22 Plans and limits
What is free, what counts as a prompt, and when you would need to pay.
Right now everything is free.
During the launch period every signed-in account is unlimited. No card, no countdown, and no pricing controls in the panel at all.
When the launch period ends.
A new account gets 24 hours of unlimited use, then settles onto the free plan. Accounts that joined during launch get a day of unlimited use and a notice in the panel first.
The free plan allows 30 prompts a day.
The count resets daily.
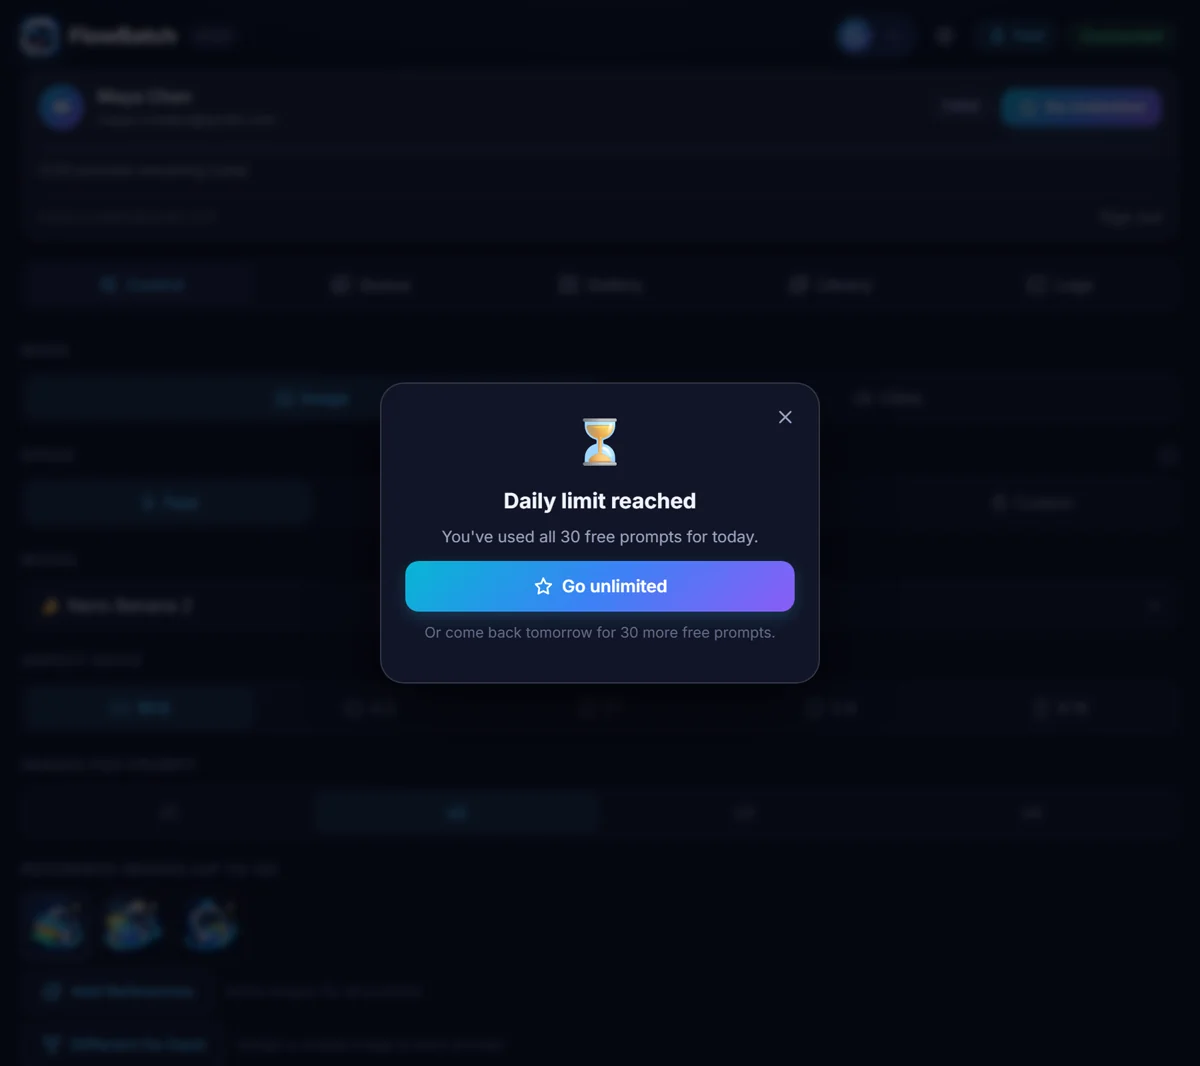
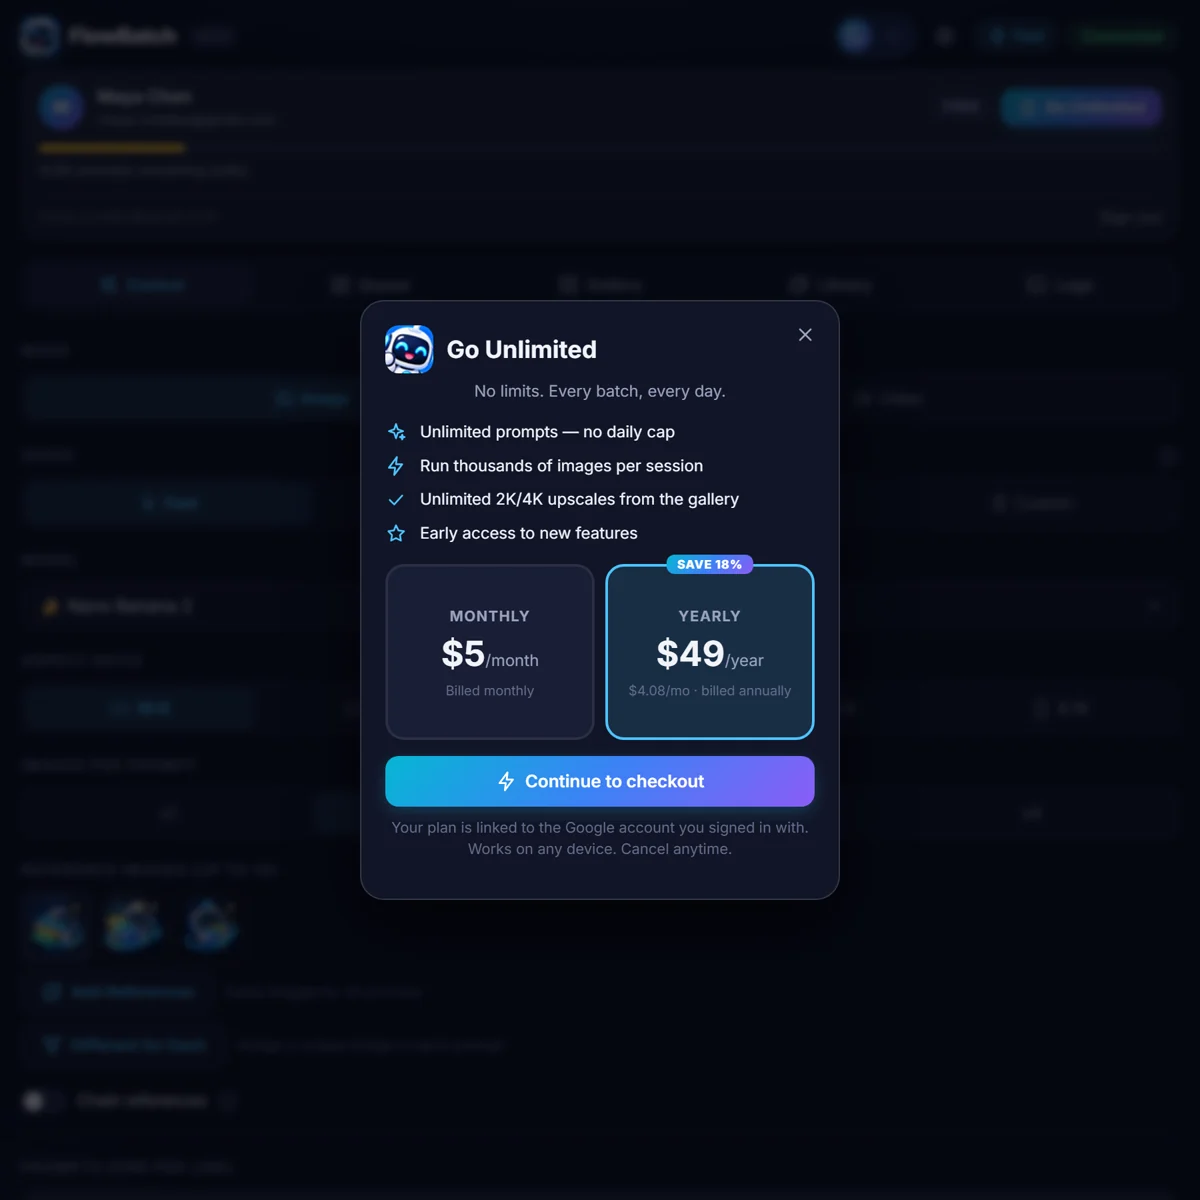
Unlimited removes the daily cap.
$5 a month, or $49 a year.
One prompt is one line you run.
Asking for four images from one line is still one prompt. An upscale you request from the Gallery counts as a prompt on the free plan.
Failed prompts are given back.
If Google fails a prompt it is refunded to your daily count rather than charged to it.
Payment goes through Lemon Squeezy.
Card details never reach FlowBatch. We only receive whether your subscription is active. Cancel any time and access continues to the end of the period you paid for.
Your plan follows your Google account.
Sign in anywhere and you have the same plan. There is no device limit.
Your Google quotas are separate.
Model limits and video credits belong to your Google account. No plan of ours changes them.
Troubleshooting
The problems people actually hit, and what fixes them.
| What you see | Why | What to do |
|---|---|---|
| Badge says Disconnected | No Flow tab open, or the tab has no project open. | Open flow.google.com in the same window, open a project, click the badge and press Re-check. |
| Connected but nothing generates | The Flow tab was reloaded or navigated away mid-batch. | Go back to the Flow project, press Re-check, run the batch again. Anything finished is kept. |
| "Unusual activity" from Google | Google flagged the browsing session, usually after many rapid requests. | Press Fix "Unusual Activity" at the bottom of the Control tab, clear the data on the page it opens, reload Flow and sign in again. Then run at Balanced or Slow. |
| The batch slows down on its own | Google answered with a rate limit. FlowBatch is backing off deliberately. | Nothing. It speeds back up by itself. Use Balanced or Slow if it happens every run. |
| Daily limit reached | The free plan's 30 prompts for today are used up. | Wait for the reset or go Unlimited. During the launch period this cannot appear. |
| Model quota error from Google | Nano Banana Pro and Nano Banana 2 have their own daily caps on your Google account. | Switch to Lite, or come back tomorrow. This limit is Google's, not ours. |
| 4K greyed out, or 4K files arrive at 2K | 4K needs a Google AI Ultra account. | Use 2K, or upgrade your Google plan. The fallback is automatic, so you still get the file. |
| Filenames are wrong or unnumbered | Another extension is also renaming downloads. | Disable that extension while a batch runs, then re-download the items from the Gallery. |
| Chrome asks where to save every file | Chrome's "Ask where to save each file" setting is on. | Turn it off at chrome://settings/downloads. |
| Gallery thumbnails turn grey | Google's preview links expire after a while. | Keep the Flow tab open so FlowBatch can refresh them. Your saved files are unaffected. |
| A reference image is skipped | Flow rejected the upload. FlowBatch retried it once as a smaller JPEG. | Re-save the image as a JPEG under 1280 pixels and upload it again. The Logs name the file. |
| Sign-in window closes with nothing happening | The Google sign-in popup was blocked or dismissed. | Click Sign in with Google again and keep the popup in focus until it closes itself. |
| The panel is too narrow | Chrome sets the side-panel width, not FlowBatch. | Drag the panel's left edge. |
Still stuck
Email flowbatch267@gmail.com
Open the Logs tab, press the copy button, and paste the log into your message with one sentence about what you were doing. That is almost always enough for us to find the problem.
FlowBatch is an independent extension. Google Flow, Veo and Nano Banana are Google products, and problems coming from Google's side are named as such in the Logs.